Introduction
DICOM stands for Digital Imaging and COmmunication in Medicine. The DICOM standard addresses the basic connectivity between different imaging devices, and also the workflow in a medical imaging department. The DICOM standard was created by the National Electrical Manufacturers Association (NEMA), and it also addresses distribution and viewing of medical images. The standard comprises of 18 parts, and is freely available at the NEMA website: http://medical.nema.org. Within the innards of the standard is also contained a detailed specification of the file format for images. The latest version of the document is as of 2008. In this article, we present a viewer for DICOM images. We also demonstrate the way to modify the brightness and contrast of the displayed image through Window Level.
DICOM Image File Format
We now present a brief description of the DICOM image file format. As with all other image file formats, a DICOM file consists of a header, followed by pixel data. The header comprises, among other things, the patient name and other patient particulars, and image details. Important among the image details are the image dimensions - width and height, and image bits per pixel. All of these details are hidden inside the DICOM file in the form of tags and their values.
Before we get into tags and values, a brief about DICOM itself and related terminology is in place. In what follows, we explain only those terms and concepts related to a DICOM file. In particular, we do not discuss the communication and network aspects of the DICOM standard.
Everything in DICOM is an object - medical device, patient, etc. An object, as in Object Oriented Programming, is characterized by attributes. DICOM objects are standardized according to IODs (Information Object Definitions). An IOD is a collection of attributes describing a data object. In other words, an IOD is a data abstraction of a class of similar real-world objects which defines the nature and attributes relevant to that class. DICOM has also standardized on the most commonly used attributes, and these are listed in the DICOM Data Dictionary (Part 6 of the Standard). An application which does not find a needed attribute name in this standardized list may add its own private entry, termed as a private tag; proprietary attributes are therefore possible in DICOM.
Examples of attributes are Study Date, Patient Name, Modality, Transfer Syntax UID, etc. As can be seen, these attributes require different data types for correct representation. This 'data type' is termed as Value Representation (VR) in DICOM. There are 27 such VRs defined, and these are AE, AS, AT, CS, DA, DS, DT, FL, FD, IS, LO, LT, OB, OF, OW, PN, SH, SL, SQ, SS, ST, TM, UI, UL, UN, US, and UT. For example, DT represents Date Time, a concatenated date-time character string in the format YYYYMMDDHHMMSS.FFFFFF&ZZXX. Detailed explanations of these VRs are given in Part 5 (Sec. 6.2) of the Standard (2008 version). An important characteristic of VR is its length, which should always be even.
Characterizing an attribute are its tag, VR, VM (Value Multiplicity), and value. A tag is a 4 byte value which uniquely identifies that attribute. A tag is divided into two parts, the Group Tag and the Element Tag, each of which is of length 2 bytes. For example, the tag 0010 0020 (in hexadecimal) represents Patient ID, with a VR of LO (Long String). In this example, 0010 (hex) is the Group Tag, and 0020 (hex) is the Element Tag. The DICOM Data Dictionary gives a list of all the standardized Group and Element Tags.
Also important is to know whether a tag is mandatory or not. Sec. 7.4 of Part 5 of the Standard (2008 version) gives the Data Element Type, where five categories are defined - Type 1, Type 1C, Type 2, Type 2C, and Type 3. If your application deals with, for instance, Digital X-Ray, then, refer to Part 3 of the Standard (2008 version), Table A.26-1 to identify the mandatory and non-mandatory tags for this. For example, from that table, again refer to C.7.1.1 to identify mandatory and non-mandatory tags corresponding to Patient. Repeat this for all entries in Table A.26-1. Similar is the case with other modalities.
One more important concept is Transfer Syntax. In simple terms, it tells whether a device can accept the data sent by another device. Each device comes with its own DICOM Conformance Statement, which lists all transfer syntaxes acceptable to the device. A Transfer Syntax tells how the transferred data and messages are encoded. Part 5 of the DICOM Standard gives the Transfer Syntax as a set of encoding rules that allow Application Entities to unambiguously negotiate the encoding techniques (e.g., Data Element structure, byte ordering, compression) they are able to support, thereby allowing these Application Entities to communicate. (One more term here -Application Entity is the name of a DICOM device or program used to uniquely identify it.) Transfer Syntaxes for non-compressed images are:
- Implicit VR Little Endian, with UID 1.2.840.10008.1.2
- Explicit VR Little Endian, with UID 1.2.840.10008.1.2.1
- Explicit VR Big Endian, with UID 1.2.840.10008.1.2.2
Images compressed using JPEG Lossy or Lossless compression techniques have their own Transfer Syntax UIDs. A viewer should be able to identify the transfer syntax and decode the image data accordingly; or display appropriate error messages if it cannot handle it.
More points on a DICOM file:
- It is a binary file, which means that an ASCII-character-based text editor like Notepad does not show it properly.
- A DICOM file may be encoded in Little Endian or Big Endian byte orders.
- Elements in a DICOM file are always in ascending order, of tags.
- Private tags are always odd numbered.
With this background, it is now time to delve into the DICOM File Format. A DICOM file consists of these:
- Preamble: comprising 128 bytes, followed by,
- Prefix: comprising the characters 'D', 'I', 'C', 'M', followed by,
- File Meta Header: This comprises, among others, the Media SOP Class UID, Media SOP Instance UID, and the Transfer Syntax UID. By default, these are encoded in explicit VR, Little Endian. The data is to be read and interpreted depending upon the VR type.
- Data Set: comprising a number of DICOM Elements, characterized by tags and their values.
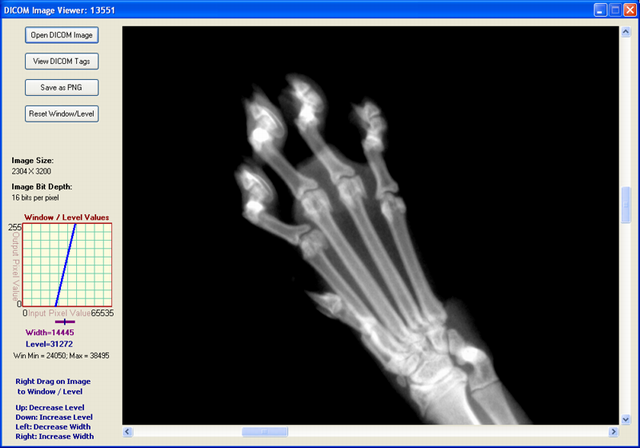
The main functionality of a DICOM Image Reader is to read the different tags, as per the Transfer Syntax, and then use these values appropriately. An image viewer needs to read the image attributes - image width, height, bits per pixel, and the actual pixel data. The viewer presented here can be used to view DICOM images with a non-compressed transfer syntax. Further, the DICOM file should be as per the latest version of the standard (2008 version).
DICOM Image Viewer Code
There are a number of freeware DICOM image viewers available. However, we could not find any viewer implemented in C#. ImageJ is a free Java-based viewer (with source code) capable of displaying images of many formats, including DICOM. Our intention here was to emulate the ImageJ code in C#, and create a no-frills simple viewer for DICOM files.
The functionality for this viewer is:
- Open DICOM files with Explicit VR and Implicit VR Transfer Syntax
- Read DICOM files where image bit depth is 8 or 16 bits. Also to read RGB DICOM files with bit depth of 8, and 3 bytes per pixel - these images are obtained from the Ultrasound modality.
- Read a DICOM file with just one image inside it
- Read a DICONDE file (a DICONDE file is a DICOM file with NDE - Non Destructive Evaluation - tags inside it)
- Display the tags in a DICOM file
- Enable a user to save a DICOM image as PNG
This viewer is not intended to:
- Check whether all mandatory tags are present
- Open files with VR other than Explicit and Implicit - in particular, not to open JPEG compressed Lossy and Lossless files
- Read old DICOM files - requires the preamble and prefix for sure. Earlier DICOM files do not have the preamble and prefix, and just contain the string 1.2.840.10008 somewhere in the beginning. For our viewer, the preamble and prefix are necessary
- Read a sequence of images
Though DICOM images frequently store their pixel data as JPEG-compressed, we have not included JPEG decompression in this application, since it would shift the focus elsewhere.
The code is written in C#, and built on Visual Studio 2008. The software itself is organized into a set of files as follows:
- DicomDictionary.cs, which contains the DICOM Dictionary, as contained in Part 6 of the Standard:
class DicomDictionary
{
   public Dictionary<string, string> dict = new Dictionary<string,string>()
   {
       {"20002", "UIMedia Storage SOP Class UID"},
       {"20003", "UIMedia Storage SOP Inst UID"},
       {"20010", "UITransfer Syntax UID"},
       {"20012", "UIImplementation Class UID"},
       {"20013", "SHImplementation Version Name"},
       ...
       {"FFFEE000", "DLItem"},
       {"FFFEE00D", "DLItem Delimitation Item"},
       {"FFFEE0DD", "DLSequence Delimitation Item"}
   };
}
- DicomDecoder.cs, whose main function is to parse the DICOM file and store the necessary attributes appropriately. One of the important methods here is intended to get the next tag:
int GetNextTag()
{
   int groupWord = GetShort();
   if (groupWord == 0x0800 && bigEndianTransferSyntax)
   {
      littleEndian = false;
      groupWord = 0x0008;
   }

   int elementWord = GetShort();
   int tag = groupWord << 16 | elementWord;

   elementLength = GetLength();

   // "Undefined" element length.
   // This is a sort of bracket that encloses a sequence of elements.
   if (elementLength == -1)
   {
      elementLength = 0;
      inSequence = true;
   }
   return tag;
}
- ImagePanelControl.cs, reused from an earlier article written by us. This image panel contains inbuilt image scrolling should the image size become bigger than the display area.
- WindowLevelGraphControl.cs, which has the primary responsibility of displaying the graph control on the screen. An explanation of Window Level is given below.
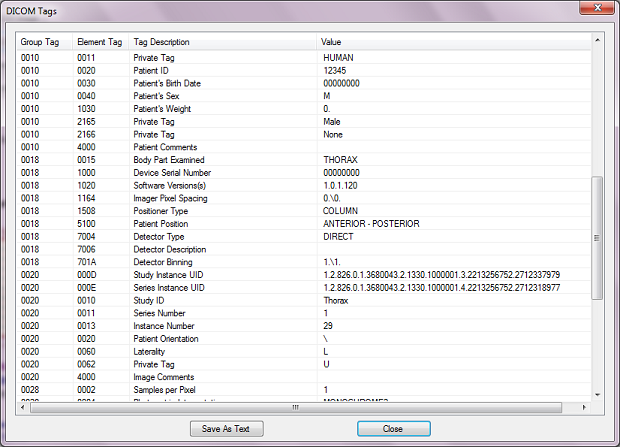
The main form has four buttons - for opening a DICOM file, for viewing the tags, for saving as a PNG file and for resetting to the original Window Level values. If the user wants to view the tags and their values, the following screen comes up, giving a list of the different tags present in the file.
Window Level and Window Width
An image when displayed is characterized by its brightness and contrast. When you increase the grayscale value of each of the pixels by one unit, then you're effectively increasing the brightness of the image by unity. Similarly with decreasing of the brightness. An image with overall low brightness appears dark; whereas one with overall high brightness appears bright. Contrast is a measure of the difference between the high and low values in an image. If two adjacent pixels have a large difference in grayscale values, the contrast between them is said to be high; conversely, if two adjacent pixels have a small difference in grayscale values, they are said to have a low contrast between themselves. Another way of representing brightness and contrast is through Window Level and Window Width. Stated in simple terms, Window Width is the difference between the brightest and dullest pixel value as displayed. And Window Level (also called Window Center) is the mid value between the brightest and dullest pixel value. Understanding these is simple if it is noted that there are four values involved:
- Image Minimum, which is the minimum value among all grayscale values in any particular image
- Image Maximum, which is the maximum value among all grayscale values in the image
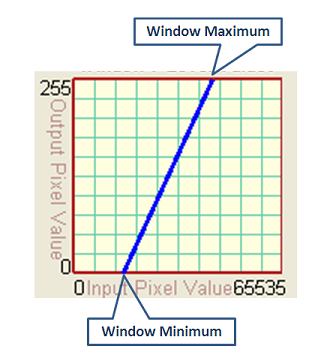
- Window Minimum, which is the lower threshold value being displayed as zero intensity (dark) on the screen
- Window Maximum, which is the higher threshold value being displayed as highest intensity (bright) on the screen
The first two values listed above depend on the image, whereas the next two values depend on the user's settings. All image pixels with grayscale intensity less than the Window Minimum are displayed as dark (zero intensity), whereas all image pixels with grayscale intensity greater than the Window Maximum are displayed as bright (maximum intensity, usually 255). Between the Window Minimum and Maximum values, a mapping function (linear or nonlinear) maps image grayscale values to displayed output valued. For purposes of this article, we restrict to a linear mapping as shown in the figure below (for a 16-bit image).
This can also be seen in another way. The brightness and contrast of an image can be adjusted to highlight features of interest. This is called "Windowing" of the image. When the image is windowed, the displayed shades of gray are adjusted. In essence, the Window Minimum and Window Maximum are manipulated so as to better see the image features. The Window Level is the middle value between Window Minimum and Window Maximum; in other words, it is the central value and is therefore also called Window Center. The larger this number, the darker appears the image; and vice versa. Window Width is the difference between Window Maximum and Window Minimum. Larger the difference, higher the contrast. For example, considering a 16-bit image, the user may want to focus on those pixels with intensities between 40000 and 50000; in this case, the Window Level becomes the midpoint value 45000, and Window Width becomes the difference value 10000. In this application, the rectangular window in the left of the screen shows the pixel mapping from input to output. The figure below gives an extract of the screen with just the Window / Level part shown. The Window Width is shown by the length of the purple line. Window Level is indicated by the position of the marker.
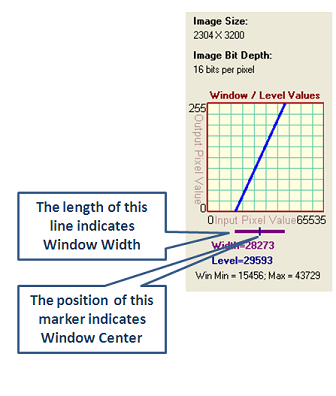
When the Window Minimum or Maximum fall outside the range of the original image, the line indicating Window Width changes to a dashed style as shown in the figure below:
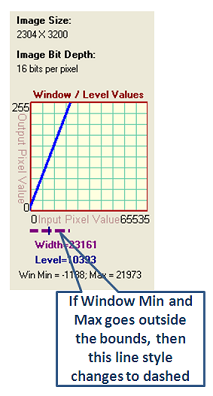
To change Window Level and Width on the image, just right-drag (click and move the right mouse button) on the image. Right-drag in the vertical direction to modify Window Level. Right-drag in the horizontal direction to modify Window Width. You may save the image as PNG with the current Window Level settings.
Known Issue
When you open an image and press the Alt button, the image disappears. However, it comes back after forced repainting, say by minimizing and restoring the viewer window.
Closure
In this article, a simple application to display a DICOM file was described. The DICOM jargon was explained briefly followed by a brief explanation of the DICOM file format. This application was heavily inspired by ImageJ. The viewer shown here can be used to view files with Transfer Syntax of Explicit and Implicit VR, and not for those containing compressed image data. You may also modify the Window Width and Level of the image by right-dragging on it.

No comments:
Post a Comment